Background

Saturday, July 30, 2011

Creating with Wood

I enjoy using power tools and what better way to get the chance to use them than working with wood! Here is a sneak peek of a new line I am working on to easily display and change out photos, notes, recipe cards, and more. These wood holders start at $20. Email me at: judesigns@hotmail.com if you would like to purchase one for yourself or as a gift.


Here is a photo of when I started assembling these holders.


Once they were assembled I spray painted them.


I really like the shabby chic look, so once the paint was dry I distressed them with sand paper and decided how I was going to decorate them. Some I added a metal clip to, this one I added paper and then finished it with burlap flowers, as you will see in the following photo.


I am having fun using burlap! This one has a metal plate on the front covered with burlap, so it is magnetic. Here is a photo to show how fun it is to use as a photo holder.


And here is a photo to show how easily it can be used as a recipe card holder. I am just loving these wood holders and know you will too!

Wednesday, July 27, 2011

Mixed Media Artwork

I have been wanting to try mixed media for awhile, but never had the opportunity until recently. I attended a Crop Retreat in Wichita, Kansas, put on by Scrapbook Chicks, and took a mixed media class. I fell in love with the technique instantly!! I decided mixed media would be fun to use on all kinds of metal and wood pieces, so that is exactly what my new line will be - Mixed Media on Metals and Woods. Believe it or not, I have picked up several different pieces over the past several months, so I am ready to create!


Here is a photo of the mixed media I did on a canvas at the class I took:


Here is a photo of my first mixed media art piece I sold. It is called "Count your many Blessings".


The inspiration for this piece came from the old hymn "Count your many Blessings". I used pages from an only hymnal, with that song printed on it, as the background.


From there I added other papers, paints, stamps, chipboard, and rub ons. The bird is a magnet and can be placed anywhere on the platter. I also decided to add a hanger to the back side, so it can either be displayed on an easel or hung on a wall. This art piece sold for $40. If you would like to order a Mixed Media art piece, email me at: judesigns@hotmail.com.


Monday, July 18, 2011

Trash to Treasures Class Sneak Peek

The Trash to Treasures Class is only one week away! It is Monday, July 25th at 6:30pm. It will be held at Studio B, 115 N. Santa Fe, Salina. This weekend I attended a retreat where I was able to prepare for the class as well as purchase the fun papers we will be using. With it being summer and very hot outside, I decided to go with bright & cheerful colors on our projects. There are still openings for the class, so if you would like to attend, be sure to e-mail me at: judesigns@hotmail.com by Friday, July 22nd.

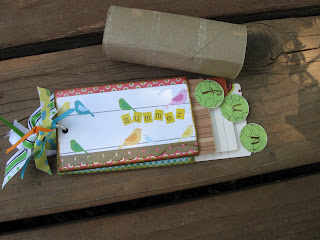
Here are some of the projects we will be making, using recycled water bottles, cans, & toilet paper/paper towel rolls.


Here are some fun things a water bottle can be turned into!


Mini-albums are a fast and easy way to scrap special memories or to make for gifts. It is especially fun when you can make them by recycling paper towel rolls & toilet paper rolls. We will be using colorful paper from the Stella Rose, Echo Park, & October Afternoon for this project.


Cutting the bottoms off of pop top cans can make fun surprise gifts. Fill them with candy, glue the bottom back on, and Viola! a fast and fun gift. We will be using paper from Fancy Pants Designs on this project.

Monday, July 11, 2011

New kitchen countertops

I haven't had a lot of time lately for paper crafting, but instead have been working on house renovation projects. I am pretty tickled at how they turned out, so I thought I would share them with you.

My first project was updating our kitchen. We had a friend, who is a contractor, come in and do a mini-remodel for us. The kitchen was dark, so we had more lighting installed, enlarged the space for the fridge and added new tile. After getting a quote on how much it would be to get new countertops, I decided I would try my hand at something that I have seen all over the internet, Faux Granite Countertop Painting. I did some research and decided on the Giani kit. It was a pretty simple process until the top coat. I messed up in an area and had to sand it down and redo which slowed the process down, but mainly because I was dragging my feet to put another top coat on, because I really didn't want to mess it up again. It is not perfect, but the end result looks pretty good.

Here are some photos:

Kitchen before remodel (white tile, appliance and no lighting):


Kitchen after the remodel (new appliances, tile and lighting):


Kitchen countertops before:


Countertops during the process:


Completed countertops. Love how it looks with the new tile!

Saturday, July 9, 2011

Welcome!

I am in the process of moving everything over to this new blog address.

In the mean time feel free to view all of my past entries here at:
Dippity Dot Inspirations by J.U. Designs


Thanks for your patience as I get things moved over!