Background

Tuesday, April 30, 2013

Paint Organizer for My Craft Area


I love to create, but I also love organization, so I am always looking for easy and inexpensive ways to keep things organized.  I have a little corner in our basement that is my "Craft Area" and since it isn't very big I continue to look for ways to keep it organized, so I have more space to create.  

Lately my paints had started taking over my work area, so I began looking for a solution.  

 I was thrilled when I came across this wonderful wood spice rack at a thrift store for less than $3!

 I applied some colorful spray paint and voila, it now helps keep my paints organized and off my work area!

 It is large enough to hold all of my paints and glues and even has space for more.


Wednesday, April 17, 2013

Springy Door Decor


Here is a quick post to show you my new inexpensive Springy door decor!  I across a couple of plastic oval frames at a thrift store awhile back and knew they would be perfect for something and they were!  I forgot to get a picture of what they looked like before I painted them, but they were a yucky gold color.


I got out the spray paint and started painting with some fun Springy colors!  Then I tore some cream colored fabric and tied the frames together. I was also able to find some pretty flower sprays at the Dollar Tree, which added the extra color I was needing. I really like how fun and different it turned out.  I am thinking of adding a chalkboard to one of the frames, so I can leave neat messages to our guests, postman, UPS man, etc.  Think that would brighten their day?


Cost:  Since I already had the spray paint and the fabric, this project only cost me around $5! 

**After my first post I decide to add a magnetic chalkboard to the blue oval frame and really like being able to leave messages on it!  The very first photo shows you what it looks like now.


Tuesday, April 2, 2013

Kitchen Series - Memo Boards


Another thing I find helpful to have in my kitchen area are memo boards.  I enjoy writing notes of encouragement and messages to my family, as well as displaying photos.  There are so many fun, creative, and inexpensive ways to make memo boards, so I thought I would share a few.  Check out more ideas and photos on my facebook page at: Dippity Dot Creations.

The photo above shows a small wall located in my kitchen/dining room area, in which I enjoy displaying collectibles, photos, and messages.  I came across some silver platters at a local thrift store and brought them home to turn them into memo boards.  The two platters hanging on the wall I used ribbon and hot glue to connect them together and hang them.  I then cut and attached decorative paper to fit inside each of them and made coordinating magnets, so I can easily display photos and notes.  The round platter hanging below the shelves, I used chalkboard paint on the inside and used ribbon to hang it.


This photo shows another platter that I picked up at a thrift store.  It is a nice large platter and was already painted black, so I just added some chalkboard paint in an area on the inside to write messages and added a vinyl saying and chef.


The photos above and below are a couple of memo boards I just recently completed and have for sale.  To check out all of the items available for sale visit my facebook page at: Dippity Dot Creations.

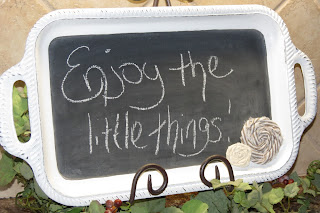
The memo board above is made from a metal platter in a shabby chic design.  The inside is a chalkboard and comes with to magnet fabric flowers.

The photos below are of a painted cutting board that I upcycled into a memo board.  I repainted it, added chalkboard paint to the front, distressed, and added torn fabric to hold the chalk and to hang it.  There are many other fun ways to turn items into memo boards.  Feel free to share any photos of ones you have made or like!