Background

Sunday, November 27, 2011

Blessing Baskets/Gifts

My whole family was able to be together during Thanksgiving this year, so I put together Blessing Baskets/Gifts for them. The baskets included a few fun things for the kids, Orange Slices (which are one of my brothers favorite candies), sugared pecans and walnuts, fall candlering and pick and a "Blessings" magnetic/chalkboard sign. Since the Orange Slice bag wasn't fall'ish enough for me I wrapped them in a brown paper bag. I found a great crockpot recipe for sugared pecans and walnuts, so I made it and put them in paper cones I made from scrapbook paper.

The sign was something new I have been wanting to make, so this was the perfect opportunity. It is metal and one side is covered with burlap and I added the word "Blessings" in black vinyl. I made the magnets out of clay, painted them, and added magnets to the back.

The other side of the sign is painted in chalkboard paint and I added a design to it with white vinyl. I wanted to make some kind of magnetic chalk holder, so the chalk would be easy to get to to leave notes, words of encouragements, etc., so I took black ribbon and glued burlap to it. I then glued velcro to the ends, added a magnet, and viola - a chalk holder. :)

I really enjoyed the time I was able to spend with my family and hope you did too!

Thursday, November 17, 2011

Getting ready for Christmas

Dippity Dot is getting ready for Christmas. So many fun decorating and gift ideas I want to make and less than 37 days to make them in, yikes! I thought I would post some pictures of things I currently have for sale and are being displayed at Studio B, 115 N. Santa Fe, Salina, KS. If you see anything that you would like to purchase or have any questions, please drop me an email! Studio B will be open a lot more from now until Christmas, so be sure to check my Facebook page or email me for additional times. I can also let you in, if the times we are open don't work for you, so just let me know.

Friday, November 4, 2011

Repurposed Old Windows

I came across some neat old four pane windows for sale and snatched them up. There are so many fun ideas I have in store for them! I wanted to share some photos and the process in which I used for the Window Memo Board I just completed. I am pretty tickled with how it turned out!

Most of the paint was coming off of the window, so I scraped off the remaining loose paint and roughly added a black base coat.

I then decided I wanted to work with two other colors on top of the black to give it a good antiqued/distressed look. An easy way I have found to do this is by either using a pure soap bar, here I used Dove, or a taper candle. You rub the soap or candle across areas of the paint you want the black to show through. Once you add the next layer of paint and let it dry you can easily sand off the areas you rubbed with the soap or wax, because it will resist the paint!

I wanted to make this window very practical as well as decorative, so I added a magnetic chalkboard in the bottom right hand corner with key magnets. I used chalkboard paint on a piece of metal and glued it onto the window. I also added an upside down drawer pull underneath the window to hold chalk.

In the photo below you can see that I added bent keys at the top of the left window to hold a dry erase marker for leaving notes on the window. On the top right and bottom left of the window I added cork board, which I painted black and used a stencil to paint the wording and keys. I also made key thumbtacks to use on these cork boards. Like I mentioned earlier, I am really loving the way it turned out and hope that you were inspired as well. :)

Here is another old window memo board that I also just completed. I used cork board covered in fabric for two of the windows, took out the upper right window and added chicken wire, and kept the glass in the lower left window and added the word "Memo" with vinyl. For embellishments I added a neat old door knob with plate and an old hinge on the bottom to hold the dry erase marker. I made thumbtacks out of keys for the cork boards and finished it off with burlap flowers.

Here is a photo of an old window that was replaced in our basement. I have been wanting to do something with it, so I could use it in our front dining room. It is a work in progress, but I thought I would show you what I have done to it so far. Since our walls are very colorful I wanted to go with a slightly distressed white frame. I then designed the tree and the word "Life" on my computer and cut it out of vinyl on my Cricut. I turned the far right window pane into a cork board, so I can display sayings or pictures. I also added some old looking hardware at the bottom and haven't decided what I am going to do with the top yet. I plan on hanging a wire or string across the bottom to be able to clip more notes and photos. :)

Yep,another one. This one is painted in a distressed black. Chicken wire was added in the right window pane, paper flowers are glued to the left window, and keys added to the bottom to hold the dry erase marker. The saying "Enjoy the simple things" is painted across the top.

Wednesday, November 2, 2011

Chipboard Journals & Altered Clipboards

Wow, I can't believe November is here already, which means Thanksgiving and Christmas are right around the corner! I haven't posted in awhile, so I thought I would share some photos of chipboard journals and altered clipboards I have completed recently to fill orders and to have for sale. Hope they will be an inspiration to you!

Below is a photo of a chipboard Photo Journal and Scrabble necklace I made for my niece's birthday. She got a camera for her birthday, so I was hoping that she would enjoy placing some of the pictures she takes into her very own album.

Below are a couple of Mom & Me journals I made for a mom who wants to use them with her daughters to write and answer questions back and forth to each other. What a great way to keep communication open between mother and daughters!

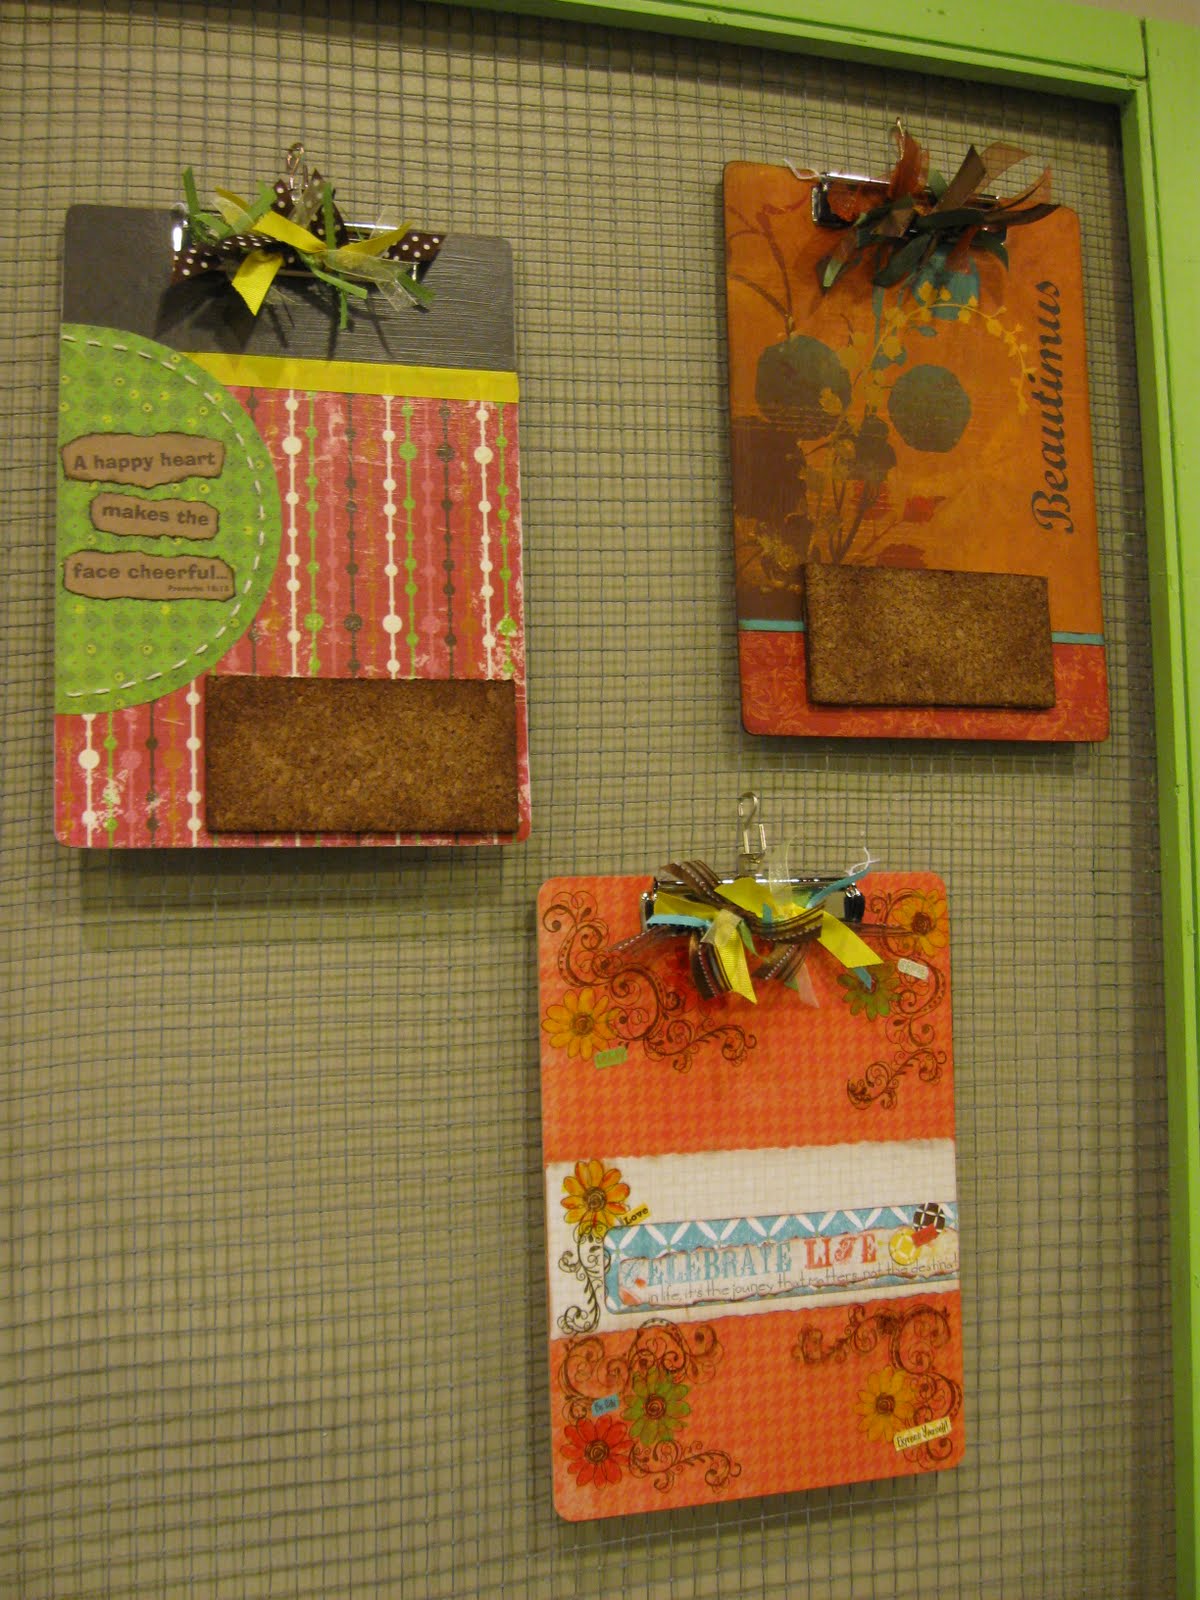
Here are some photos of clipboards I recently have altered. The photo below I took before adding the push pins I made and I can't seem to find the photos of the completed clipboards. The clipboard on the left has a verse from Proverbs and says "A happy heart makes the face cheerful". I made push pins out of buttons and added to the cork board. The clipboard to the right says "Beautimus", a word I use often to describe beautiful things I see. I make matching push pins out of glass beads and added to this board. There is a photo if it below. The bottom clipboard says "Celebrate Life".

The clip board on the left, in the photo below, is decorated with purple, white, and black paper and I added a white embossed bird that says "A bird doesn't sing because it has an answer, it sings because it has a song". The clip board on the right is a photo of the completed "Beautimus" clip board with push pins. You may recognize the magnetic wall hanging at the bottom from an earlier post. This is a metal hanging covered in decorative paper and hung together with brown ribbon. The flowers are magnets I made to use for easily hanging photos, notes and more.

This last photo is of a clipboard I made for a custom order. They wanted it to be as smooth as possible, so it could be used as a clipboard, wanted blues and greens, and wanted the saying from Mark Twain. In order to accomplish smoothness I only used a thin piece of paper to put the saying on and hand painted the flowers.

Monday, October 24, 2011

Autumn Decor!

I have so much fun decorating the house with Autumn colors! Here are some photos of some of the decorations I made or put together and am using. Hope they give you some inspiration. I will be adding more photos soon, so don't forget to check back!

I picked up this plate last year and wanted to display it on my kitchen counter. It was a little too plain to display all by itself, so I added a small fall swag and designed the saying on my computer and cut it out using my Cricut on black vinyl.

Here is a photo of a pumpkin I made out of an old book and used orange color wash spray to add color to it and painted the stem brown. In the back is a photo/recipe card holder that I made and added a recent picture my kiddos that was taken on our recent trip to a local pumpkin patch. For more photos and information on how I made the photo holder visit: Creating with Wood

This next picture is the decor on my counter in the dining room. I found the neat metal leaf piece on clearance last year. I added pumpkins and leaves for color. The jars and holder I found at a thrift store. I painted the holder black, cleaned out the pasta noodles and spaghetti out of the glass containers and think they are a great addition for height.

"Praise God from all Blessings flow" framed art

I love the weather and all of the magnificent colors that come with the autumn season. I wanted to create an art piece that would grasp some of the beauty of the season, so I created this "Praise God from whom all Blessings flow" piece. The frame is painted black and is distressed. The background is made of layered autumn colored papers. I also incorporated decoupaged leaves and burlap for texture and dimension. The size is: 15.25W x 19"H. If you have any questions about this piece or any other, don't hesitate to send me an email.

Thursday, October 20, 2011

Revamped Cork Board

After being revamped...
Before being revamped...
Here is a cork board I just finished revamping. I loved the design of the board the minute I saw it, but It has taken me a while to figure out what I wanted to do with it. With the weather finally cooling down outside, giving the flowers a chance to bloom, the butterflies have come out to play and that was finally the inspiration I needed for this piece. The frame is painted in an antiqued turquoise color. The butterflies are made out of old hymn book and book pages and attached to a wire running up the side. The yellow flower is made from fabric and has pearls nestled in the middle. At the top I used the saying "Follow your dreams never let them slip away". At the bottom I used a couple of old drawer handles, adding the possibility to hang keys or other items. This is on sale for $59. If you have any questions don't hesitate to email me at: judesigns@hotmail.com. Thanks for stopping by!