Pages

Thursday, March 22, 2012

Spring has arrived!

This week is Spring Break around here and I have been able to make the best of it, in spite of my whole family taking turns getting the flu. I have enjoyed staying up late, while everyone is sleeping, and completing projects on my list as well as starting new ones. Below are some photos of a few Spring decor items. (FYI - I have just started working on the 4-pane window displayed in this picture, so if you are interested in it and have color preferences, cork board vs. chalkboard, etc., be sure to send me an email and I will make it the way you want it!)

"You are loved always" frame
I came across the "you are loved always" saying, on a Valentine themed project, and thought how fitting it would be to use with an image of the cross. I designed the saying the way I wanted it on the computer, then took some scrapbook paper and printed it off onto it. I then used my Cricut to cut out the cross and flowers. A simple and fun project. Give it a try or if you would like to order one, email me at: judesigns@hotmail.com.

Colorful Magnetic Tray - $25
This next project was fun, but a little more time consuming, due to the wet/damp weather we are having this week. I took a silver tray and spray painted it, which the paint doesn't seem to want to dry, even though the paint can says "quick drying". Like I mentioned earlier, I am sure it is because of the damp weather. I just don't have a lot of patience when it come to waiting for things to dry, whether it is paint or glue. :) I used white, yellow, and hot pink fabric and felt flowers for color in the lower right corner of the tray and added the saying "Life is Beauty filled" with vinyl along the top. This also comes with two button magnets (not pictures, because the glue was still drying and I was in a hurry to get the photos taken, before taking everything to the Studio). This magnetic tray will brighten any spot of your home and will provide a cheerful way to display photos and notes.

"Bloom" banner- $15
Here is a banner I made by layering chipboard on the bottom, old hymn book pages glued onto the chipboard, and then burlap glued on over that. I pulled and cut away some of the burlap, so you can see portions of the music paper from behind. I used my Cricut machine to cut out the word "bloom", added a couple of butterflies, and fabric flowers for color. I have it displayed on my newly painted chest at the Studio! Doesn't the chests look lots better now?! Once the paint is completely dry, I hope to fill it with more fun things to sell. :)

Bottle Cap Necklaces & Key Chains - starting at $6
This last photo is a close up of a couple bottle cap necklaces and a key chain I recently made. I didn't have any left in my inventory, so I decided I needed to make more. I also make square glass pendant necklaces and Scrabble piece necklaces. All of which can be custom made with a name, photo, initial, etc. Just drop a note to: judesigns@hotmail.com to place an order.

Tuesday, March 20, 2012

XL Magnetic Memo Board

I just finished this nice XL Magnetic Memo Board! I can custom design these to fit any room of the house or for any gift occasion. If you would like to purchase this memo board, please email me at: judesigns@hotmail.com. To see other items I have for sale, visit my facebook page at: Dippity Dot Creations

This is a wood frame, painted in a distressed black, and measures 30 3/4" x 15". Everything included on the board is a magnet, so you can position them however you want.

Here is a close up of the magnets included. There are bottle caps, buttons, Scrabble squares, and old keys.

Here is a close up of the burlap flowers that are also magnets.

The ornate wood ornament measures 9.5" x 4.5" and is painted in a crackle black paint. The board is covered in a yellow/orange colored fabric that has white and black in the design.

Sunday, March 18, 2012

Sweet 16 Birthday Party

My beautiful, smart, and talented daughter turned 16 this month! What a fun and memorable birthday.

Her only requests were colorful decorations, clear serving dishes, and candy dishes filled with her favorite candies. How fun is that?! Below are some photos I took before all of the guests arrived. Her dad and I bought her a bouquet of flowers, which really added a lot of color to the table. Since the archway is one of the first things you see as you enter, I decided to make a colorful banner with the number 16 out of scrapbook paper and hung it up.

Here are a couple of close-up photos of the candy dishes I put together. I visited a local thrift store and found some neat glass containers with lids as well as some pretty glass goblets. I glued the glass container onto the glass goblet to create candy dishes. The one over on the buffet was glued onto a white chic candlestick holder, which I think turned out really cute. For more color we made several tissue paper balls and flowers to add to the tables and hung some from the hutch doors.

Do you see the photos scattered about? I am a scraparrazi mom, so a few of my bazillion photos had to be shared. My daughter was a good sport about it, as long as she was able to approve them, before I set them out. That in itself was a fun trip down memory lane. :)

On the punch table we decorated it with tissue paper flowers and a couple of large fan flowers, I made out of scrapbook paper. I came across a couple of small vases, which really looked neat with some of the pretty yellow flowers from the big bouquet. I cut the letter "C" out of chipboard, since it is the first letter of my daughter's name, and painted it white. We had the birthday guests write something fun to the birthday girl, so she could keep it and hang it in her room.

Friday, March 16, 2012

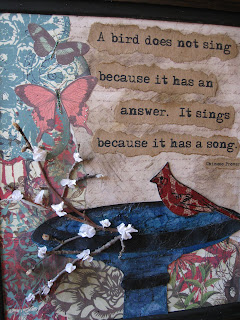
"A Bird" Mixed Media Framed Art

I completed my second Spring art piece! My inspiration for this piece came from a photo, in an old Better Homes and Gardens magazine that I was thumbing through the other day. The photo was of a robin standing on the side of a blue birdbath with cherry blossom branches laying inside and below is how my piece turned out!

"A bird does not sing because it has an answer. It sings because it has a song", is such a neat Chinese proverb. This dark stained wood frame is, 16 1/4" wide x 18 1/4" tall. This piece is for sale for: $60. Email me if you would like to purchase it. To see other items I have for sale visit my Facebook page at: Dippity Dot Creations - Items for Sale

I decided to use a Cardinal inside the birdbath, because that is one of my favorite birds. We have a couple that frequent our backyard and they are so fascinating to watch and beautiful to listen to. The Cardinal is cut from kraft and glittery red paper. I added the eye, beak, and wings with black Stickles.

I cut the birdbath out of chipboard and added wrinkled tissue paper as well as a variety of blue and black inks to get the look I was going for. It is hard to see in the photos, but inside the birdbath I used Glossy Accents, which gives the look of water. I added branches that had buds and added tissue paper blossoms for more color and dimension.

Butterflies are another beautiful sign of Spring, so I added a couple of butterflies and embellished them with Stickles, to add a little extra bling.

Saturday, March 10, 2012

"Wonderfully made" Mixed Media Tray

I am so ready for Spring to arrive. I enjoy the colors, listening to the birds sing, and watching butterflies fly from one flower to the other. It is so fun to see nature come back to life after the Winter months.

This Mixed Media piece is done on an old tray and includes several of my favorite things...bright colors, butterflies, birdcages, birds, and part of the verse from Psalms 139:14, "I praise you because I am fearfully and wonderfully made; your works are wonderful, I know that full well."

This piece is for sale for: $40. It measures 17 1/4" wide x 8 3/4 high and has two hangers attached to the back, allowing it to be hung or set on an easel.

Email me with questions or if you would like to purchase this tray. To see other items I have for sale visit my Facebook Page at: Dippity Dot Creations - Items for Sale

Saturday, March 3, 2012

Double Sided Pedestal Frames

Here are a couple of double sided pedestal frames I just recently completed. I came across this neat idea on the Mud Pie Studio Blog. I took two 5" x 7" frames, painted them, glued them together and then glued them to a painted wood candlestick. Below are some photos of how they turned out.

Pedestal frame #1 - On this pedestal frame I made both sides magnetic. Here is a photo of the magnetic chalkboard side. I thought it needed a little bit more dimension, so I added flowers made from old book pages and added color using color wash. I also made a magnetic chalk holder, so it would always be close.

Here is a photo of the other side of the pedestal frame #1. I added some fun paper, to metal, placed it on the inside of this frame, and made magnets out of colored glass beads. This would make a great recipe cards holder for the kitchen or an easy way to display photos and notes.

Pedestal frame #2 - On this pedestal frame used black crackle paint and created a framed art piece for the inside of one of the frames and a magnetic chalkboard for the other side. Here is a photo of the framed art piece I did. The idea came from Donna Downey's Blog. I enjoy using water color crayons, stamps, and embossing powder, so this was a lot of fun to make. I added the saying "Enjoy the little things, for one day you may look back & realize they were the Big things."

Here is a photo of the magnetic chalkboard side of pedestal frame #2. It is pretty much the same as frame#1. I really like how both of these turned out!